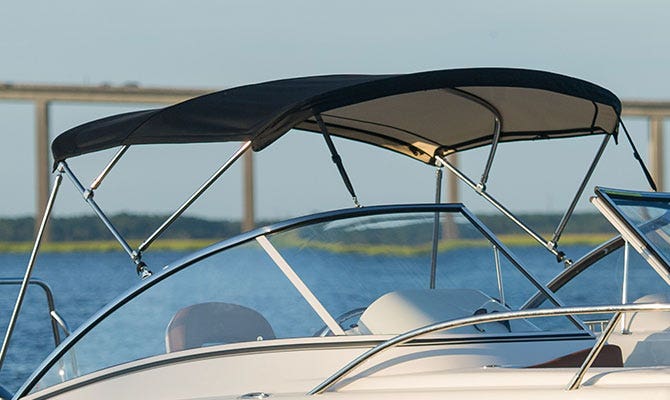
Unleash Your Boat’s Style with Sunbrella Bimini Tops: The Ultimate Guide to Sun Protection and Style On the Water

When it comes to enjoying a day out on the water, protection from the sun is essential. Sunbrella Bimini Tops not only offer the ultimate sun protection for you and your boat, but they also add a touch of style and sophistication. In this comprehensive guide, we will explore the benefits of Sunbrella Bimini Tops and how they can enhance your boating experience.

sunbrella bimini tops

The Benefits of Sunbrella Bimini Tops

1. Superior Sun Protection

  • Sunbrella fabric is known for its UV protection properties, blocking out harmful rays and keeping you and your passengers safe from sunburn.
  • Enjoy long days on the water without worrying about overexposure to the sun.

2. Durability

  • Sunbrella fabric is highly durable and resistant to fading, ensuring that your Bimini Top will look great for years to come.
  • With proper care and maintenance, Sunbrella Bimini Tops can withstand the elements and harsh marine environment.

Enhancing Style on the Water

1. Variety of Colors and Designs

  • Sunbrella offers a wide range of colors and patterns to choose from, allowing you to customize your Bimini Top to suit your personal style.
  • Add a pop of color or opt for a classic look to complement your boat's aesthetic.

2. Sleek and Streamlined Appearance

  • Sunbrella Bimini Tops are designed to provide maximum coverage while maintaining a sleek and stylish look.
  • Enhance the overall appearance of your boat with a Sunbrella Bimini Top that adds a touch of sophistication.

Installation and Care Tips

1. Proper Installation

  • Ensure that your Sunbrella Bimini Top is securely mounted to your boat to prevent damage or shifting while underway.
  • Follow manufacturer guidelines for installation or consult a professional for assistance.

2. Regular Maintenance

  • Clean your Sunbrella Bimini Top regularly with mild soap and water to remove dirt and debris.
  • Allow your Bimini Top to air dry completely before folding or storing to prevent mold and mildew growth.

Tips for Choosing the Right Sunbrella Bimini Top

1. Size and Coverage

  • Consider the size of your boat and the amount of coverage you need when selecting a Sunbrella Bimini Top.
  • Ensure that the Bimini Top provides adequate shade for all passengers on board.

2. Material and Construction

  • Choose a Sunbrella Bimini Top with high-quality materials and sturdy construction for long-lasting durability.
  • Look for features such as reinforced stitching and corrosion-resistant hardware for added strength and reliability.

Conclusion

Unleash your boat's style with Sunbrella Bimini Tops and enjoy the ultimate combination of sun protection and style on the water. Whether you're cruising the open seas or relaxing at the marina, a Sunbrella Bimini Top will enhance your boating experience and keep you looking great while staying protected from the sun's harmful rays. Choose from a variety of colors and designs to customize your Bimini Top to suit your personal style, and follow our installation and care tips to ensure long-lasting durability. With Sunbrella Bimini Tops, you can enjoy the sun, sea, and style in comfort and sophistication.


Meet the Pros: A Day in the Life of an Interior Wall Painter

Image Source – Google

Interior wall painters play a crucial role in transforming a space and bringing life to a room through color and design. Their work involves much more than simply applying paint to walls. From preparation to finishing touches, every step requires precision, skill, and creativity.

If you want to hire a skilled interior painter then you browse this website https://grecopaintingco.com/interior-and-exterior-painting-mequon/.Let's take a closer look at a day in the life of an interior wall painter.

Preparation Is Key

Gathering Supplies

  • Interior wall paint
  • Paint brushes
  • Rollers
  • Tape measure
  • Drop cloths
  • Sandpaper

Before starting any painting job, an interior wall painter must gather all the necessary supplies to ensure a smooth workflow. From paint brushes to drop cloths, having the right tools at hand is essential for a successful project.

Preparing the Space

  • Moving furniture
  • Covering floors and furniture
  • Removing outlet covers
  • Filling in holes and cracks

Once the supplies are ready, the painter needs to prepare the space for painting. This involves moving furniture out of the way, covering floors and furniture with protective materials, and preparing the walls by filling in any holes or cracks.

Executing the Painting Job

Priming the Walls

  • Applying primer evenly
  • Allowing primer to dry

Priming the walls is an important step in the painting process as it helps the paint adhere better and ensures a more even finish. The painter must apply the primer evenly and allow it to dry completely before moving on to the next step.

Applying the Paint

  • Choosing the right paint color
  • Applying paint in smooth, even strokes
  • Using a brush for corners and edges
  • Using a roller for larger areas

Once the walls are primed, it's time to apply the paint. The painter must choose the right color for the space and apply the paint in smooth, even strokes. A brush is typically used for corners and edges, while a roller is used for larger areas to ensure a consistent finish.

Finishing Touches

Clean-Up

  • Removing drop cloths and protective materials
  • Returning furniture to its place
  • Wiping down surfaces

After the painting job is complete, the painter must clean up the space to leave it looking neat and tidy. This involves removing drop cloths and protective materials, returning furniture to its place, and wiping down surfaces to remove any paint splatters or dust.

Inspection

  • Checking for any touch-ups needed
  • Ensuring a seamless finish

Before considering the job done, the painter must inspect the walls for any touch-ups that may be needed. It's important to ensure a seamless finish and address any areas that may require additional attention before declaring the project complete.

Flexibility and Creativity

Adapting to Different Spaces

  • Working in small rooms
  • Tackling large, open spaces
  • Adjusting to different wall textures

Interior wall painters must be adaptable and comfortable working in a variety of spaces. Whether it's a small, cramped room or a large, open area, painters need to adjust their techniques to suit the space and achieve the desired result.

Bringing Designs to Life

  • Creating accent walls
  • Using stencils or patterns
  • Incorporating different finishes

Interior wall painters have the opportunity to get creative and bring designs to life through their work. Whether it's creating an accent wall, using stencils or patterns, or incorporating different finishes, painters can add a unique touch to a space and make it truly one-of-a-kind.

As we've seen, the life of an interior wall painter is filled with variety, creativity, and attention to detail. From preparation to finishing touches, each step in the painting process plays a crucial role in transforming a space and creating a beautiful environment.


From the Heart: Groom Speech Examples to Inspire Your Own Words

Image source: Google

One of the most anticipated moments at a wedding reception is the groom's speech. It's a chance for the groom to express his love, gratitude, and hopes for the future in front of family and friends. Writing a heartfelt and memorable speech can be a daunting task, but looking at groom speech examples can provide inspiration and guidance. Here, we will present some touching groom speech examples that can help you in crafting your own heartfelt words.

Inspiring Groom Speech Examples

1. Expressing Love and Gratitude

  • "To my beautiful bride, you are my rock, my love, and my best friend. From the moment I met you, I knew you were the one I wanted to spend my life with. I am so grateful to have you by my side, and I promise to cherish and love you every day for the rest of our lives."

2. Acknowledging Family and Friends

  • "I want to take a moment to thank our families and friends for being here today. Your love and support mean the world to us, and we wouldn't be where we are without you. We are blessed to have such amazing people in our lives."

3. Sharing Memories and Hopes for the Future

  • "As I look back on the memories we've created together, I can't help but smile. Each moment has brought us closer and strengthened our love. I can't wait to create more memories with you and build a future filled with love, laughter, and happiness."

Tips for Crafting Your Groom Speech

1. Start Early

Begin writing your speech well in advance to give yourself plenty of time to revise and refine your words.

2. Personalize Your Message

Speak from the heart and share personal stories and anecdotes that are meaningful to you and your partner.

3. Keep It Concise

Aim for a speech that is heartfelt but not overly long. Keep your guests engaged by keeping your speech to a few minutes.

4. Practice, Practice, Practice

Rehearse your speech multiple times to ensure you feel comfortable and confident delivering it on the big day.

5. Consider Professional Help

If you're struggling to find the right words, consider hiring a speechwriter to help you craft a speech that truly captures your feelings.

Conclusion

Your groom speech is a special moment to express your love and commitment to your partner in front of your loved ones. Drawing inspiration from heartfelt examples and following these tips can help you create a speech that is sincere, touching, and memorable. Remember to speak from the heart, and your words are sure to resonate with everyone in the room.


Stay Fresh and Clean: The Ultimate Guide to Portable Camping Showers

Camping is a wonderful way to connect with nature, but it can also leave you feeling dirty and sweaty without access to a shower. Portable camping showers are the perfect solution to staying fresh and clean while enjoying the great outdoors. In this ultimate guide, we will explore everything you need to know about portable camping showers, from types and features to tips on how to use them effectively.

Types of Portable Camping Showers

Pressurized Water Tank Showers

  • Use air pressure to deliver a steady stream of water
  • Easy to use and provides good water pressure
  • Require manual pumping or a separate air pump

Solar Shower Bags

  • Use solar energy to heat water
  • Lightweight and easy to transport
  • Good for warm water showers

Battery-Powered Showers

  • Powered by rechargeable batteries
  • Provide consistent water flow
  • Some models come with adjustable water temperature

Features to Consider

Water Capacity

  • Choose a shower with an adequate water capacity for your needs
  • Consider the number of people using the shower and the length of showers

Portability

  • Look for a shower that is lightweight and easy to transport
  • Consider the size and weight of the shower when packed up

Heating Options

  • If you prefer warm water showers, opt for a solar shower bag or a battery-powered shower with a heating element
  • Consider the availability of sunlight for solar showers

How to Use a Portable Camping Shower

Set Up

  • Find a flat and stable surface to set up your shower
  • Assemble the shower according to the manufacturer's instructions
  • Fill the water tank or bag with water

Heating the Water

  • If using a solar shower bag, place it in direct sunlight for a few hours to heat the water
  • If using a battery-powered shower with a heating element, activate the heating function

Showering

  • Adjust the water temperature and flow to your liking
  • Use biodegradable soap to minimize environmental impact
  • Rinse off thoroughly to remove soap and dirt

Disassembly and Cleaning

  • Empty the water tank or bag after use
  • Rinse out the shower components to remove soap residue
  • Allow the shower to dry completely before packing it up

Tips for Using Portable Camping Showers

Choose a Shaded Area

  • Set up your shower in a shaded area to avoid the water heating up too much in the sun
  • Alternatively, use a solar shower bag early in the morning or late in the evening when the sun is not as strong

Use a Privacy Shelter

  • Invest in a privacy shelter or shower tent to provide some privacy while showering
  • Make sure the shelter is easy to set up and spacious enough to move around comfortably

Practice Leave No Trace Principles

  • Dispose of soapy water away from natural water sources
  • Use biodegradable soap to minimize environmental impact
  • Pack out all trash and leave your campsite cleaner than you found it

With the right portable camping shower and these tips in mind, you can stay fresh and clean during your outdoor adventures. Whether you prefer a quick rinse or a leisurely warm shower, there is a portable camping shower to suit your needs. Happy camping!